
Scary Baboon Reimagined Laboratory Map: Halls, Elevators and the Shop
The abandoned lab is the whole game in Scary Baboon Reimagined. Here is what is documented about its halls, the elevators some monsters guard, and the shop that turns scrap into coins and gear.
Scary Baboon Reimagined has no world outside its facility: the entire game — you, the other players and the monsters — takes place inside one abandoned lab. That's why "the map" comes down to knowing the lab's documented areas and what each one is for, rather than memorizing room coordinates. There are three of them: the halls, the elevators and the shop.
Quick answer
The abandoned lab's documented areas are its halls, its elevators and its shop — the halls where you scavenge, the elevators some monsters guard, and the shop where scrap becomes coins and gear. Exact room locations aren't documented; the descriptions cover what each area is and how it's used.
- Halls: where monsters roam and where you move, collect scrap and stay alive with friends — stay quiet and don't get caught.
- Elevators: recognizable landmarks with a catch — some monsters guard them, so treat every elevator as a caution zone.
- Shop: where you sell the scrap collected around the lab, earning the coins that pay for your gear.
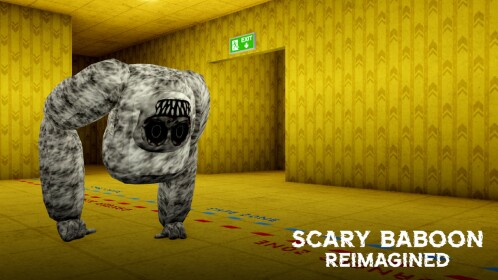
One lab, the whole game
Scary Baboon Reimagined (the VertexLabs experience, currently on its 👁️🗨️ MIMIC update) traps you inside the abandoned lab from the start, together with other players and the monsters roaming its halls. There is no outside area, so every route you plan, every scrap run and every chase happens within this one facility. Each monster hunts in its own way, which is what turns familiar hallways into unpredictable territory — watching how each monster behaves is part of learning the map itself.
A note on precision: the official description documents these areas by type and purpose, not as a room-by-room floor plan. Treat the image above as a look inside the lab's halls and this page as a landmark guide — what each area is and how to behave in it.
The halls — where every run happens
The halls are the connective tissue of the lab and the part of it you will use most. Monsters roam them, and they are where you move while collecting scrap and staying alive with friends. The survival advice tied to them is consistent: stay quiet and don't get caught. That advice isn't decorative — some monsters hear every step you take, so quiet movement through the halls is what separates a clean scrap run from a chase.
If you're planning your first runs, the beginner guide and the lab exploration guide cover how to move through the facility, while the scrap-finding guide covers the scavenging side in detail.
The elevators — landmarks that come with guards
Elevators are one of the lab's recognizable landmark types, and the reason they matter on a map page is what's attached to them: some monsters guard the elevators. An elevator is therefore both a navigation point and a danger marker — a spot where extra caution is needed the moment you arrive.
One honest limitation: the official description documents the landmark type, not specific elevator locations. Which elevators are guarded, and where each one sits in the facility, isn't documented, so the reliable habit is to give every elevator you find the same caution rather than assume some are clear. Our breakdown of the elevator monsters explains which behavior to expect there.
The shop — where scrap turns into gear
The shop is the lab's economic landmark. Scrap is collected around the lab, and the shop is where you sell it: selling scrap earns you coins, and that income is what buys the gear that keeps you alive. In other words, the shop is the destination that gives scavenging its purpose — every haul from the halls only becomes progress once it's converted here.
Like the elevators, the shop is documented by function rather than by its exact spot in the facility, so expect to learn where it is through your own exploring. Once you're selling regularly, the shop guide, the scrap-selling walkthrough and the coins guide cover the economy in detail, and our best gear rundown helps you spend those coins well.
How the three areas connect
The documented areas form one loop, and seeing the loop is what makes the map click:
The scrap loop
Scavenge the halls
Scrap lies around the lab, and the halls are where you move to collect it — quietly, with monsters roaming.
Sell at the shop
Your collected scrap is sold at the lab's shop, the conversion point for everything you gathered.
Earn coins, get gear
Selling scrap earns coins and turns the haul into the gear that keeps you alive.
Head back out
With gear and preferably friends, return to the halls for the next haul — quieter and better equipped than before.
The loop repeats: each sale at the shop funds the gear that keeps you alive long enough to collect more scrap in the halls.
The monsters that make each area different
Every area above behaves differently because the monsters do. The documented hunting styles of the current MIMIC-update roster map directly onto the lab's landmarks:
- Sound-sensitive monsters hear every step you take. This is the behavior that shapes the halls — it's why quiet movement is the standing advice there.
- Look-away monsters only move when you look away. Wherever you meet one, the counter is keeping it in view while you reposition or retreat.
- Elevator guards hold the elevators. This is why elevators double as danger zones on an otherwise navigational landmark.
Because each monster hunts in its own way, no single rule keeps you safe lab-wide — watch how the one in front of you behaves. Our monsters overview breaks down the full roster, with dedicated pages for the sound-sensitive, look-away and elevator types.
Related Guides
All Maps: Lab & Backrooms
See every playable area confirmed so far: the laboratory and the Backrooms, and what makes each one different.
Elevator Monsters: Get Past Safely
Cross the elevator areas safely: why guards wait there and the routes and timing that get you past them.
Shop Guide: Scrap Into Gear
Use the shop well: sell scrap for coins, then turn those coins into the gear and upgrades your runs need.
How to Find Scrap & Stay Hidden
Find scrap efficiently room by room, and keep monsters from noticing you while you carry it out.